

ElaProof+SAND Floor covering instructions for use
ElaProof + SAND Floor Covering is M1 approved. It is suitable for indoor and outdoor use e.g. terraces, stairs, balconies and bathrooms.
In the product, the ElaProof coating and the sand are in a ready-to-use mixture. There are three sand sizes to choose from: fine, medium rough and rough.
Preliminary work before coating
The product is suitable for indoor and outdoor use on most floor surfaces. The floor surface can be e.g. chipboard, gypsum board, concrete, ceramic tile, plastic carpet, epoxy, acrylic and polyurethane. Before starting the coating work, familiarize yourself with the preliminary work required for the surface material of your site. Please, download the ElaProof Coating Method for Flooring at:
www.elaproof.com
Coating:
Mix ElaProof+SAND Floor Coating before use. Use a whisk in the mixer that does not take air into the sealant when mixing. ElaProof+SAND Floor covering is applied to the substrate with a steel trowel in two separate applications. The consumption of each application must be at least approx. 2.0 kg/m2, in which case the total consumption is at least 4.0 kg/m2. The final dry film thickness must be min. 2.0 mm. The drying time between layers is highly dependent on the conditions at the installation site. Under conditions of about +20°C, 50% RH, application can be performed about 5 hours after the first application. Lower temperatures and higher humidity significantly extend the drying time. The ElaProof + SAND floor covering, applied twice, can be applied after approx. 12 h at + 20°C, 50% RH.
NOTE! If necessary, the product can be diluted 1 to 2 percent by weight (2 to 4 dl for a 20 kg container). If you dilute the product, start with a small amount of water and add more if necessary.
Varnishing:
The dried ElaProof+SAND coating is treated with clear ElaProof TopCoat or coloured ElaProof TopCoat RAL topcoats to facilitate cleaning and maintenance. For monochromatic floors, we recommend topcoating with ElaProof TopCoat RAL topcoat to compensate for any color differences in the ElaProof+SAND coating. Mix the topcoat according to the instructions on the package.
Apply the top coat to the dried ElaProof+SAND coating with a short-pile roller (6-7 mm) by cross-rolling. The consumption of the topcoat is approx. 110-200 g /m2/ application, depending on the degree of roughness of the selected ElaProof+SAND coating. The topcoat is walking dry after approx. 16 h at +20°C, 50% RH. The full duration of mechanical stress is achieved under the above conditions in about 4 days and the full chemical duration in about 7 days.
Note:
Some shades of ElaProof TopCoat RAL topcoats may require 2-3 coats to achieve sufficient coverage! See a separate table for the opacity of ElaProof TopCoat RAL topcoats.
Storage:
MUST NOT FREEZE BEFORE USE. The substance will keep unopened in a cool place away from sunlight for at least 12 months.
Structural drawings
All structural drawings related to ElaProof products in DWG and PDF format from the ProdLib-service.
Updated: 06/2023 | MA
ELACOAT TopCoat instructions for use
Preparations
The substrate must be structurally sound, clean, dry and free from substances that weaken adhesion such as dust, dirt, grease, oil or loose material layers. ELACOAT TOPCOAT must be applied within 48 hours of installing the ElaProof coating.
Application
The product is delivered in a 2-component package, where the components are in the correct mixing ratio. Mix component A for at least 1-2 minutes. Then pour the entire B component into the A component and mix the mass carefully with a suitable mixer for at least 2–3 minutes until the varnish is of uniform quality. After that, pour the mixture into a clean container and mix for a while. Avoid creating air bubbles in the mixture during mixing.
On dense and non-absorbent substrates such as ElaProof coating, pour ELACOAT TOPCOAT onto the substrate and spread parallel with a roller (pile 7-11 mm) or rubber trowel. On smooth surfaces, roll with a short-pile microfiber roller. Finish with a new microfiber roller in parallel. Avoid air bubbles during installation.
Clean used tools with water before they dry.
Varnishing again
Varnishing must be done again within 1-2 days of the previous one.
Cleaning and maintenance
Separate maintenance and cleaning instructions available. We recommend regular cleaning and a maintenance program. Before using the varnished surface, we recommend basic cleaning and maintenance.
Technical support
You can get information on the possibilities of using the systems and detailed advice on the use of ELACOAT and ElaProof products from Build Care Oy’s technical advice, tel. +358 20 790 2710 or info@buildcare.fi
Structural drawings
You can find all structural drawings related to ElaProof products in DWG and PDF format in the ProdLib-service.
01/2023 | MA
ELACOAT TopCoatRAL instructions for use
Preparations
The substrate must be structurally sound, clean, dry and free from substances that weaken adhesion such as dust, dirt, grease, oil or loose material layers. ELACOAT TOPCOAT RAL must be applied within 48 hours of installing the ElaProof coating.
Application
The product is delivered in a 2-component package, where the components are in the correct mixing ratio. Mix component A for at least 1-2 minutes. Then pour the entire B component into the A component and mix the mass carefully with a suitable mixer for at least 2–3 minutes until the varnish is of uniform quality. After that, pour the mixture into a clean container and mix for a while. Avoid creating air bubbles in the mixture during mixing.
On dense and non-absorbent substrates such as ElaProof coating, pour ELACOAT TOPCOAT RAL onto the substrate and spread parallel with a roller (pile 7-11 mm) or rubber trowel. On smooth surfaces, roll with a short-pile microfiber roller. Finish with a new microfiber roller in parallel. Avoid air bubbles during installation.
On absorbent and porous substrates, use a trough intended for a roller or a similar container to help with application. Dip the roller in the trough and roll the excess surface varnish on the collection edge of the trough. After that, apply the topcoat by rolling it parallel to the base.
Clean used tools with water before they dry.
Varnishing again
Varnishing must be done again within 1-2 days of the previous one.
Cleaning and maintenance
Separate maintenance and cleaning instructions available. We recommend regular cleaning and a maintenance program. Before using the varnished surface, we recommend basic cleaning and maintenance.
Technical support
You can get information on the possibilities of using the systems and detailed advice on the use of ELACOAT and ElaProof products from Build Care Oy’s technical advice, tel. +358 20 790 2710 or info@buildcare.fi
Structural drawings
You can find all structural drawings related to ElaProof products in DWG and PDF format in the ProdLib-service.
01/2023 | MA
ELACOAT TopCoat and TopCoat RAL Floor maintenance and cleaning instructions
Floor maintenance and cleaning instructions for ELACOAT TOPCOAT and ELACOAT TOPCOAT RAL coated floors
General info
Coated floors must be carefully protected during construction, thus ensuring the quality of the coatings and good maintenance.
Commissioning cleaning
Commissioning cleaning can be done approximately 1 week after the floor is coated.
Note! If there is dust on the floor during construction, remove it first with Sani Calc free.
Detergent: Sani Calc free
Dosage: 10–25 ml / 5 l cool water

Wash the floor with a purple or green Twister disc. If necessary, use an indirect cleaning method (= the suction nozzle is kept raised and the suction motor is turned off on the first run. On the second run, the suction nozzle is lowered and the floor is washed normally).
Maintenance cleaning with a mop
The floor is cleaned using a soft brush or if a washing machine is used, a soft disc is also recommended.
Detergent: Jontec 300- series products
Dosage: 5–10 ml / 5 l cool water

Wet or damp mop the floor with a microfiber mop or dryer squeegee.
Maintenance cleaning by machine
Detergent: Water
Wash the floor according to how dirty it is with either a purple or a green Twister disc.
If necessary, use an indirect cleaning method (= the suction nozzle is kept raised and the suction motor is turned off on the first run. On the second run, the suction nozzle is lowered and the floor is washed normally).
Periodic cleaning
Detergent: Water

Wash the floor with a yellow Twister disc. If necessary, use an indirect cleaning method (= the suction nozzle is kept raised and the suction motor is turned off on the first run. On the second run, the suction nozzle is lowered and the floor is washed normally). Use the yellow Twister disc for very dirty and scratched floors/areas, e.g. in front of the serving line, entrance halls, etc. Repeat the same with the green Twister.
Please note!
Stop the dirt at the door
Most of the dirt comes from outside. Stop the dirt already at the door with an efficient and sufficient carpet system.
Commissioning cleaning
Timely and correctly performed commissioning cleaning is the basis of maintenance and periodic care. On average, commissioning cleaning can be done approximately 1 week after the floor is coated. The floor is completely resistant to mechanical stress after 7 days and completely resistant to chemical stress after 28 days.
Maintenance and periodic cleaning
Prefer mechanical methods for floor maintenance. Regular and sufficient use of a combination machine is an efficient and quick way to keep the floors in good condition and, together with periodic cleaning, postpones the need for basic cleaning.
Indirect method in the use of a combination machine
The suction nozzle is kept raised and the suction motor is switched off during the first run. On the second run, the suction nozzle is lowered and the floor is washed normally.
Furniture
Use felt paws on furniture to avoid scratches. Use a floor protector under the chairs to avoid wear marks.
Stains
Remove stains fresh. Use ready-made stain remover or e.g. Jontec Forward free. Apply the stain removal solution to the stain and let it act for 1–3 min. Rub lightly, wipe the stained area clean, rinse with water and dry. When choosing the right product, contact a Diversey representative if necessary.
Structural drawings
You can find all structural drawings related to ElaProof products in DWG and PDF format in the ProdLib-service.
Updated: 04/2023 | MA
ElaProof Art&Deco Colour Chips Installation instructions
1. Groundwork is the most important stage
1.1. Thoroughly clean the surfaces to be treated of dirt, sand, and dust.
1.2. Remove any old paint, coating, and rust.
1.3. You can use a pressure washer, brush, or other mechanical cleaning to clean the surfaces, depending on the surface material being treated.
1.4. Prime porous new or old surfaces (e.g., concrete, plastered surfaces, gypsum, and wood) with ElaProof Primer if necessary. The treatment improves the adhesion of ElaProof to the substrate by clogging the pores of the substrate.
2.1. Start by trimming any lifts with protective tape.
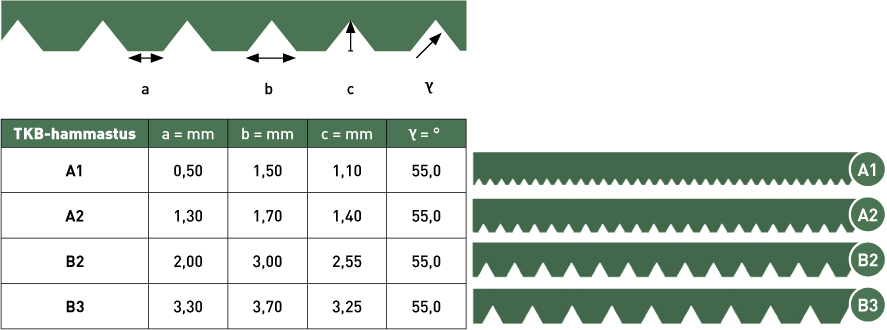
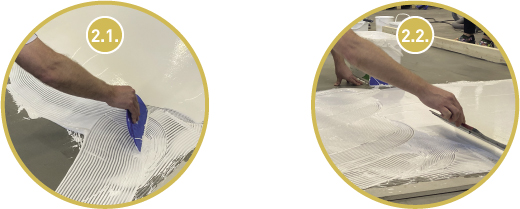
2.2. ElaProof treatment of vertical surfaces: Treat all the vertical surfaces you have delimited with ElaProof. First use a coarse spatula, e.g., TKB B2 or B3. See the next page for instructions on selecting a spatula. Instructions for applying ElaProof can be found at elaproof.com
2.3. Then smooth the surface left by the coarse spatula as smooth as possible using a metal spatula.
NOTE! If there are plenty of vertical surfaces, then proceed by approx. 1-2 meters at a time. Please follow the instructions in section 2.4.
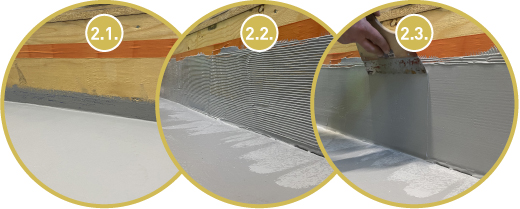
2.4. Flaking the vertical surfaces: Throw the flakes of ElaProof Art & Deco Color Chips onto the ElaProof leveled with a metal trowel by hand. At this point, you can adjust the number of flakes on the final surface.
2.5. When you have finished flaking, be sure to remove the protective tape!
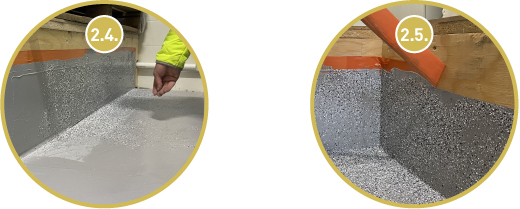
Let the ElaProof coating and flakes dry in peace!
Remember that drying out ElaProof is the evaporation of water. The drying time depends on the layer thickness, the absorbency of the substrate and the ambient temperature, dew point and relative humidity.
3. Treatment of horizontal surfaces
3.1. Start by treating all horizontal surfaces with ElaProof. This ensures the waterproofing capacity of the site. Pour ElaProof directly from the jar evenly over an area of approx. 2 m2. When applying the first coat of ElaProof, use a coarse spatula, e.g., TKB B2 or B3.
3.2. Smooth the surface of the ElaProof with a metal spatula as smooth as possible, using wide movements.
Allow the first layer of ElaProof to dry in peace overnight.
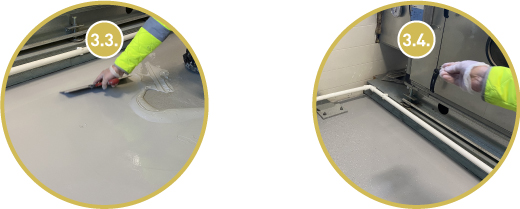
3.3. Continue by treating the horizontal surfaces with ElaProof slightly diluted with water (max. 1% by volume). Pour ElaProof evenly from the jar evenly over an area of approx. 2 m2 for easy flaking. Use a fine spatula, e.g., TKB A1 or A2. Smooth the surface as smoothly as possible with a metal spatula, using wide movements.
3.4. The easiest way to spread the flakes is to throw them by hand. At this point, you can adjust the number of flakes on the final surface.
Allow another layer of ElaProof and flake to dry in peace overnight. Collect the excess flake and treat the surfaces with ELACOAT TopCoat according to step 4.
4. ELACOAT TopCoat treatment
4.1. We recommend the use of ELACOAT TopCoat on horizontal surfaces that are exposed to wear, such as stairs and floors.
The products increase the durability of wear and make it much easier to keep the item clean.
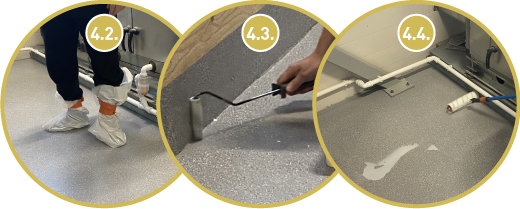
4.2. Protect the footwear with plastic bags, for example, to prevent dirt from sticking to the base.
4.3. Start treatment on vertical surfaces with a short-haired lint-free roller after the last ElaProof has dried for at least one day. Be sure to remove any excess flake before processing!
4.4. On horizontal surfaces, the product is applied on top of colored flakes by rolling with a short-haired lint-free roller. Pour the product directly on the floor and roll in parallel movements.
Mixing instructions for ELACOAT TOPCOAT
The product is delivered in 2-component packages, where the components are in the correct mixing ratio. Mix component A for at least 1-2 minutes. Then pour the entire contents of the B component into the A component and mix the mass carefully with a suitable mixer for at least 2-3 minutes until the mass is of uniform quality. After that, pour the mixture into a clean container and mix briefly. Avoid mixing air bubbles into the mixture during mixing.
This is how you choose the right spatula!
Various spatulas are used to apply the ElaProof Art & Deco products. See the table for instructions on choosing the right spatula.
TKB spatula instructions and TKB-indentation
Structural drawings
All structural drawings related to ElaProof products in DWG and PDF format from the ProdLib-service.
Updated: 01/2023 | MA
ElaProof Art&Deco Colour SAND Installation instructions
1. Groundwork is the most important stage
1.1. Thoroughly clean the surfaces to be treated of dirt, sand, and dust.
1.2. Remove any old paint, coating, and rust.
1.3. You can use a pressure washer, brush, or other mechanical cleaning to clean the surfaces, depending on the surface material being treated.
1.4. Prime porous new or old surfaces (e.g., concrete, plastered surfaces, gypsum, and wood) with ElaProof Primer if necessary. The treatment improves the adhesion of ElaProof to the substrate by clogging the pores of the substrate.
2. Treat the surfaces first with ElaProof
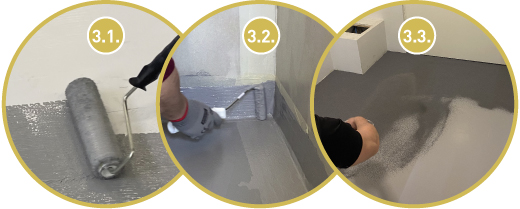
2.1. Start by treating all horizontal and vertical surfaces with ElaProof. This ensures the waterproofing capacity of the site. Pour ElaProof directly from the jar evenly over an area of approx. 2 m2. When applying the first coat of ElaProof, use a coarse spatula, e.g., TKB B2 or B3.
2.2. Smooth the surface of the ElaProof with a metal spatula as smooth as possible, using wide movements.
Allow the ElaProof dry in peace!
Remember that drying out ElaProof is the evaporation of water. The drying time depends on the layer thickness, the absorbency of the substrate and the ambient temperature, dew point and relative humidity.
3. Treat the surfaces first with ElaProof
3.1. Start the work by rolling a new layer of ElaProof coating on the surface to be treated with a short-haired roller (approx. 5-7 mm pile). If necessary, you can thin the ElaProof mass (max. 1% by volume).
3.2. It is easiest to handle the vertical surfaces of the stairs and the risers with a brush or a small roller. If it is a large surface, start with max. 4-5 m² in the area.
3.3. We recommend working in pairs – a small area at a time, with one person applying ElaProof and the other throwing sand evenly over the ElaProof coating. The easiest way to spread colored sand is by hand throwing or “sowing” sand from e.g., a small plastic bucket.
3.4. In the case of stairs and lifts, it is recommended to spread the sand from the pile with a brush, in which case the sand is spread carefully without touching the ElaProof surface.
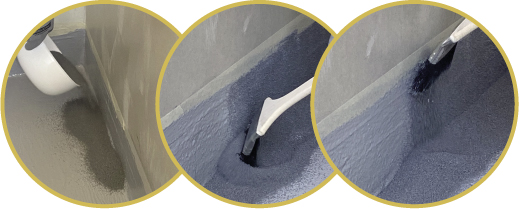
Allow the ElaProof coating and colored sand to dry overnight. Collect the excess color sand and treat the surfaces with ELACOAT TOPCOAT according to point 4.
4. ELACOAT TOPCOAT treatment increases durability and makes cleaning easy!
4.1. We recommend the use of ELACOAT TopCoat on horizontal surfaces that are exposed to wear, such as stairs and floors. The products increase the durability of wear and make it much easier to keep the item clean.
4.2. Apply after the last ElaProof surface has dried for at least one day. Remember to remove the excess colored sand before processing!
4.3. The product is spread over the colored sand by rolling with a short-haired lint-free roller.
4.4. In stair steps, it is also worth treating the vertical surfaces, which makes cleaning the object easy.
Mixing instructions for ELACOAT TOPCOAT:
The product is delivered in 2-component packages, where the components are in the correct mixing ratio. Mix component A for at least 1-2 minutes. Then pour the entire contents of the B component into the A component and mix the mass carefully with a suitable mixer for at least 2-3 minutes until the mass is of uniform quality. After that, pour the mixture into a clean container and mix briefly. Avoid mixing air bubbles into the mixture during mixing.
This is how you choose the right spatula!
Various spatulas are used to apply the ElaProof Art & Deco products. See the table for instructions on choosing the right spatula.
TKB spatula instructions and TKB-indentation
Structural drawings
All structural drawings related to ElaProof products in DWG and PDF format from the ProdLib-service.
Updated: 01/2023 | MA
ElaProof ROOF Primer installation instructions
Applications
The ready-to-use ElaProof ROOF PRIMER is designed for use on a stone-surfaced felt roof before the ElaProof coating.
Chassis
Before applying ElaProof ROOF Primer, dirt, grease, dust and other loose material are removed from the substrate and the substrate is cleaned of old paint and surface layers.
Instructions
Before application, dirt, grease, dust and other loose material are removed from the substrate and the substrate is cleaned of old paint and surface layers.
Operating temperature:
(air and surface) over +5°C. The primer is applied in a thin, even layer so that all the substance is absorbed on the surface and no ponds are formed. Only one treatment is sufficient if the substrate is not very dry and absorbent.
Tools:
roller, brush or syringe. Tools are cleaned with water.
Shelf life:
12 months from manufacture, see jar. The product must be protected from frost and direct sunlight.
Drying time:
1-3 h depending on conditions and substrate.
Consumption:
The consumption varies depending on the roughness of the surface from 70 to 120 g/m2
Structural drawings
All structural drawings related to ElaProof products in DWG and PDF format from the ProdLib-service
Updated: 05/2023 | MA
ElaProof Base Fabric Installation instructions
Using a base fabric for sealing
Apply a large amount of ElaProof sealing compound to the cleaned, flat surface with a spatula or brush so that the compound adheres to the substrate throughout. In structures where movements are possible, the ElaProof Base Fabric is pressed into the wet mass, for example with a spatula, so that no air is left between the base fabric and the base. Apply a 2nd coat of ElaProof on top of the base fabric so that the base fabric stays in place and is covered throughout. Second coat ElaProof is easiest to apply after the first coat has dried. The joints of the base fabric are overlapped by at least 30 mm and the base fabric is glued with ElaProof to the underlying support fabric. Particular attention must be paid to the tightness of corners and bushings.
Joints
The sealing principles of the connections are shown in the drawing ElaProof Indoor air sealing details that can be found on ProdLib library.
For joints with possible movements, ElaProof Base Fabric is used. In structures where there is no movement, such as in old structures where drying shrinkages and depressions have already occurred, the installation can be done without a base fabric. However, we still recommend the use of a base fabric.
The seal is overlapped on the surfaces to be sealed
– on concrete surfaces at least 30 mm
– on wooden surfaces at least 15 mm
Sealing of planar surfaces
ElaProof is applied to the flat surfaces with a trowel, roller, brush, or spray. More layers may be required to provide sufficient film thickness on the wall, ceiling, or other floating surfaces. It is recommended to apply the next coat after at least 3 hours.
The recommended material consumption is a total of 1.0 – 1.4 l / m2. The surface is touch dry after 3-4 h and walk-resistant after 15 h after installation (20 °C, RH 45%, 1 l / m2).
Post-processing
When the sealing has dried and its success has been verified, the sealing is protected as necessary with a wear-resistant surface. The dried ElaProof surface can, e.g., be painted, tiled, or plastered.
Requirement
Successful airtightness requires a dry film thickness of at least 0.5 mm, which on a flat surface corresponds to a material consumption of 0.8 l / m2. The finished coating must be well adhered to the substrate throughout. The material should be well bonded and there should be no holes in the coating.
Verification of success for airtightness usually requires quality assurance, which can be carried out, for example with marker tests in accordance with Finnish RT Card – RT 14-11197.
Cleaning of tools
Clean tools with water.
Structural drawings
All structural drawings related to ElaProof products in DWG and PDF format from the ProdLib service.
Updated: 01/2023 | MA
ElaProof Cool Roof Instructions for use
Minimum requirements for a high-pressure sprayer
ElaProof Cool Roof is applied as a high-pressure sprayer min. with a pressure of 200 bar. Sprayer yield min. 6 l/min.
Preparations
- Clean the surface from dust, loose previous paintings or coatings and other particles.
- High pressure wash is recommended min 200 bar.
- Ensure the tightness of joints and penetrations with ElaProof Classic H before spraying!
- Before starting the work, always check the coating work method according to the surface material of the target area. Seal vertical joints and surfaces with ElaProof Classic H. Use reinforcing fabric if necessary. Seal penetrations, cracks, and junctions with ElaProof Classic H and ElaProof base fabric or ROOF reinforcement fabric according to the instructions below.
- If there are clearly damaged areas or visible cracks an application of ElaProof Classic H hand coating is recommended before spraying: 1) cleaning of surface, 2) applying ElaProof H, 3) installing Base fabric in the wet surface, 4) applying ElaProof H to finish on top of the Base fabric.
- Prime with ElaProof Primer or ElaProof ROOF Primer if necessary. Priming is recommended for porous materials such as new or old concrete surfaces, mineralite, plastered surfaces and gypsum. The treatment improves the adhesion of ElaProof to the substrate and prevents the formation of air bubbles. Air bubbles rising to the surface are often a sign of too little priming. ElaProof Primer is suitable for indoor and outdoor use.
Site protection
- Protect area around surface from splatter.
- Before starting the construction site, it is recommended to check the weather and wind conditions as well as the weather forecast.
- The finished ElaProof coating must be protected from frost and rain until the film has dried. ElaProof Cool Roof is touch dry in 3-4 hours after applying (+20°C, RH 45 %, 1,5 l m/m²).
Site preparations
- Place spraying equipment to a position where it can be easily washed with water after spraying.
- Install blender to the ElaProof Cool Roof barrel and start blending.
- In case product appears to be too stiff a small amount of water (max 1 volume-%) can be added, product needs to be liquid enough to go through the spraying pump.
Fill in site report
- During installation, a site report on the installation must be completed. The manufacturer cannot verify and be responsible for the performance of a substance if its installation conditions and method of installation are not properly documented.
Spraying
- Use ElaProof in temperatures between +10°C and +40°C
- ElaProof shall be applied in temperatures over +10°C (air and surface) and relative humidity of less than 80%.
- Pressurise the pump first by using water and then move the hose to ElaProof barrel.
- Start applying ElaProof to the surface, pump pressure 150-400 bar.
- In case there are breaks during application it is recommended to drown the pump pistol in a water bucket.
- The product can also be used on new concrete substrates with remaining residual moisture. In this case, the maximum moisture content is 90% RH measured at the assessment depth A, following the instructions of RT Card 103333 (this applies in Finland, please check your local instructions). The surface of the concrete must be drier than assessment depth A at the time of coating. If it’s a concrete substrate that has become wet after the fact, for example, due to rain, the moisture content should be a maximum of 85% RH at assessment depth A and a maximum of 75% RH on the surface of the concrete. For dense substrates like metal and felt roofs, they should be dry at the time of coating.
Cleaning the equipment after spraying
- After spraying the inlet hose is to be moved to a water barrel and water is to be sprayed until there is no outcoming ElaProof
- The equipment is to be cleaned by using high pressure hose and washing liquid (e.g. Pineline)
Please note!
- Storage ElaProof in temperatures between +10°C … +40°C and protected from direct sunlight. The product must not freeze before use.
- A dried ElaProof S coating can be painted with elastic, waterborne, breathable paints. It is advisable to test the compatibility of ElaProof and a specific paint in advance.
- More technical information is available from info@buildcare.fi.
BuildCare Ltd. arranges coating training for the workers of their partners in order to ensure an impeccable, durable and high-quality coating quality.
Structural drawings
All structural drawings related to ElaProof products in DWG and PDF format from the ProdLib-Service.
Updated: 05/2024 | MA
ElaProof Classic H Instructions for use
Preparations
- Clean the surface carefully of dirt, sand, grease, loose water, organic vegetation, old layers of paint or coatings and other frail material.
- Depending on the condition of the surface, use a high-pressure washer or a brush for cleaning.
- It is recommended that porous surfaces, such as concrete, are prepared by applying ElaProof Primer for securing optimal adhesion and tightness of the coating.
- When needed, use protective equipment. ElaProof as such is safe but it is always strongly recommended to use e.g. eye protection and safety equipment when working on roofs.
Sealing of holes and crack
- Smaller holes and cracks can be filled and covered with ElaProof without special preparations.
- For larger holes and cracks (over 2 mm wide, over 5 mm deep) use of ElaProof Base Fabric is recommended. First spread ElaProof on the edges of the hole or crack. Then press Base Fabric into the moist ElaProof mass. Ensure with a trowel or a spatula that there are no wrinkles in the Base Fabric and it is firmly attached to the ElaProof mass. Finally, spread another layer of ElaProof over the Base Fabric before or after the first layer has dried.
Application
- ElaProof shall be applied in temperatures over +10°C (air and surface) and relative humidity of less than 80%.
- ElaProof H mass can be applied easily with hand tools such as spatula or short-hair brushes.
- If necessary, the product can be diluted 1 to 2 percent by weight (1.7 to 3.4 dl for a 15 litre container). If you dilute the product, start with a small amount of water and add more if necessary.
- The right amount of ElaProof for surface-covering coating depends on the evenness and porosity of the surface. For smooth surfaces an average of 1.0 l / m² is required, whereas approx. 1.8 l / m² is required for rough concrete surfaces. Sufficient coating thickness secures its long-term durability.
- ElaProof H can be applied in one or several layers. It can be applied also on damp or rusty underlayer.
- The product can also be used on new concrete substrates with remaining residual moisture. In this case, the maximum moisture content is 90% RH measured at the assessment depth A, following the instructions of RT Card 103333 (this applies in Finland, please check your local instructions). The surface of the concrete must be drier than assessment depth A at the time of coating. If it’s a concrete substrate that has become wet after the fact, for example, due to rain, the moisture content should be a maximum of 85% RH at assessment depth A and a maximum of 75% RH on the surface of the concrete. For dense substrates like metal and felt roofs, they should be dry at the time of coating.
Drying
- The ElaProof H coating compound dries by evaporating water.
- The drying time depends on the layer thickness, the ambient temperature and relative humidity, dew point, and the absorbency of the surface to which the mass has been applied.
- Drying time
- • Touch dry (+20°C, 50% RH, 1,5 l/m²) 3 – 4 h
- • Touch dry (+6°C, 25% RH, 1,5 l/m²) 40 h
- • Fully dry (+20°C, 50% RH, 1,5 l/m²) 1 day
- • Full mechanical properties (+20°C, 50% RH, 1,5 l/m²) 3 weeks
Tool cleaning and waste handling
- Wash the tools and surrounding surfaces with water immediately after application. After drying, cleaning of ElaProof can be done mechanically (e.g., the spatula can be cleaned with a knife) or with organic solvents (e.g., xylene).
- ElaProof H packaging can be disposed as energy waste. Dried ElaProof can be disposed as normal mixed waste.
Please note!
- Store ElaProof H coating mass in temperatures between +10°C … +40°C and protected from direct sunlight. The product must not freeze before use.
- ElaProof H can be stored unopened for minimum 12 months. After use, close the bucket carefully for maximising the storability of the remaining coating mass.
- A dried ElaProof H coating can be painted with elastic, waterborne, breathable paints. It is advisable to test the compatibility of ElaProof and a specific paint in advance.
- More technical information is available from info@buildcare.fi.
- ElaProof H is listed in the Nordic Ecolabelling construction product database and can be used in Swan-labeled buildings.