

ElaProof Art&Deco Colour Chips Installation instructions
1. Groundwork is the most important stage
1.1. Thoroughly clean the surfaces to be treated of dirt, sand, and dust.
1.2. Remove any old paint, coating, and rust.
1.3. You can use a pressure washer, brush, or other mechanical cleaning to clean the surfaces, depending on the surface material being treated.
1.4. Prime porous new or old surfaces (e.g., concrete, plastered surfaces, gypsum, and wood) with ElaProof Primer if necessary. The treatment improves the adhesion of ElaProof to the substrate by clogging the pores of the substrate.
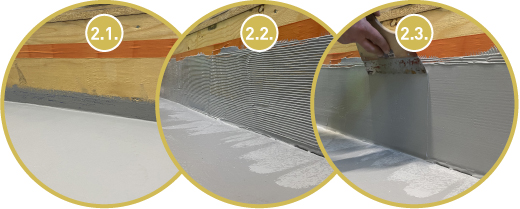
2.1. Start by trimming any lifts with protective tape.
2.2. ElaProof treatment of vertical surfaces: Treat all the vertical surfaces you have delimited with ElaProof. First use a coarse spatula, e.g., TKB B2 or B3. See the next page for instructions on selecting a spatula. Instructions for applying ElaProof can be found at elaproof.com
2.3. Then smooth the surface left by the coarse spatula as smooth as possible using a metal spatula.
NOTE! If there are plenty of vertical surfaces, then proceed by approx. 1-2 meters at a time. Please follow the instructions in section 2.4.
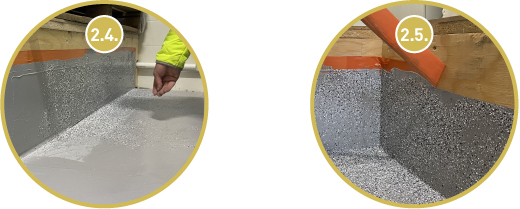
2.4. Flaking the vertical surfaces: Throw the flakes of ElaProof Art & Deco Color Chips onto the ElaProof leveled with a metal trowel by hand. At this point, you can adjust the number of flakes on the final surface.
2.5. When you have finished flaking, be sure to remove the protective tape!
Let the ElaProof coating and flakes dry in peace!
Remember that drying out ElaProof is the evaporation of water. The drying time depends on the layer thickness, the absorbency of the substrate and the ambient temperature, dew point and relative humidity.
3. Treatment of horizontal surfaces
3.1. Start by treating all horizontal surfaces with ElaProof. This ensures the waterproofing capacity of the site. Pour ElaProof directly from the jar evenly over an area of approx. 2 m2. When applying the first coat of ElaProof, use a coarse spatula, e.g., TKB B2 or B3.
3.2. Smooth the surface of the ElaProof with a metal spatula as smooth as possible, using wide movements.
Allow the first layer of ElaProof to dry in peace overnight.
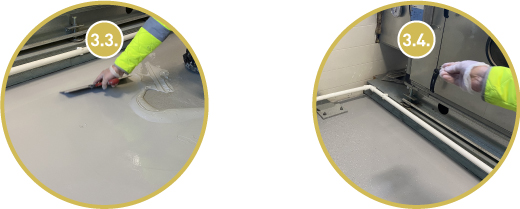
3.3. Continue by treating the horizontal surfaces with ElaProof slightly diluted with water (max. 1% by volume). Pour ElaProof evenly from the jar evenly over an area of approx. 2 m2 for easy flaking. Use a fine spatula, e.g., TKB A1 or A2. Smooth the surface as smoothly as possible with a metal spatula, using wide movements.
3.4. The easiest way to spread the flakes is to throw them by hand. At this point, you can adjust the number of flakes on the final surface.
Allow another layer of ElaProof and flake to dry in peace overnight. Collect the excess flake and treat the surfaces with ELACOAT TopCoat according to step 4.
4. ELACOAT TopCoat treatment
4.1. We recommend the use of ELACOAT TopCoat on horizontal surfaces that are exposed to wear, such as stairs and floors.
The products increase the durability of wear and make it much easier to keep the item clean.
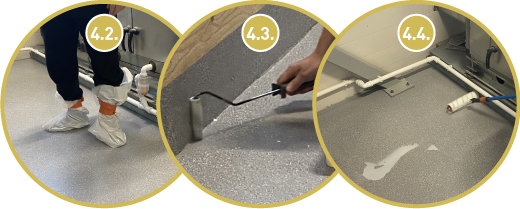
4.2. Protect the footwear with plastic bags, for example, to prevent dirt from sticking to the base.
4.3. Start treatment on vertical surfaces with a short-haired lint-free roller after the last ElaProof has dried for at least one day. Be sure to remove any excess flake before processing!
4.4. On horizontal surfaces, the product is applied on top of colored flakes by rolling with a short-haired lint-free roller. Pour the product directly on the floor and roll in parallel movements.
Mixing instructions for ELACOAT TOPCOAT
The product is delivered in 2-component packages, where the components are in the correct mixing ratio. Mix component A for at least 1-2 minutes. Then pour the entire contents of the B component into the A component and mix the mass carefully with a suitable mixer for at least 2-3 minutes until the mass is of uniform quality. After that, pour the mixture into a clean container and mix briefly. Avoid mixing air bubbles into the mixture during mixing.
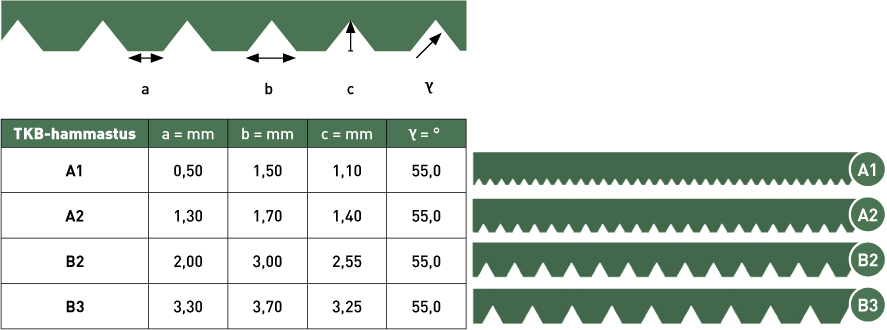
This is how you choose the right spatula!
Various spatulas are used to apply the ElaProof Art & Deco products. See the table for instructions on choosing the right spatula.
TKB spatula instructions and TKB-indentation
Structural drawings
All structural drawings related to ElaProof products in DWG and PDF format from the ProdLib-service.
Updated: 01/2023 | MA
Kaikki edellä esitetyt tiedot perustuvat tutkimustuloksiin, nykytietämykseemme ja kokemukseemme. Ne eivät poista tuotteen käyttäjän vastuuta tehdä omia testejä ja kokeita, jotta kaikki tekijät ja olosuhteet, jotka voivat vaikuttaa tuotteiden asennukseen ja käyttöön, tulisi huomioitua. Mitään takeita liittyen ominaisuuksiin tai tuotteen soveltuvuuteen tiettyihin tarkoituksiin ei voida antaa tämän tiedon perusteella. Kaikki kuvaukset, piirrokset, valokuvat, tiedot, suhteet, annoskoot, painot ym. ovat ohjeellisia. Emme ole vastuussa, mikäli tuotetta käytetään vastoin tässä esitettyjä ohjeita. Tuotteen käyttäjän vastuulla on testata tuotteen sopivuus käyttökohteeseen. Vastaamme vain tuotteen laadusta ja takaamme, että se läpäisee kriittisen laaduntarkastuksemme. Tuotetietoja päivitetään säännöllisesti, on kuitenkin käyttäjän vastuulla hankkia viimeisin voimassa oleva tuotetieto, joka löytyy osoitteesta www.elaproof.com. Pidätämme oikeuden muutoksiin. © Build Care Oy