

4.1 Chipboard- / OSB wall coating (dry rooms)
General
This coating work method is indicative and deals with the coating of a chipboard- / OSB wall with the ELAPROOF + SAND system. The ELAPROOF + SAND wall covering system consists of ELAPROOF PRIMER primer, ELAPROOF + SAND wall covering and ELACOAT TOPCOAT RAL / ELACOAT TOPCOAT topcoat
The coating work method is not a repair plan or a construction plan. The overall design of the coating is always the responsibility of the site-specific designer.
Platform refurbishment
In areas to be renovated, all possible moisture-sensitive adhesive residues must be removed from the chipboard- / OSB floor. Any loose floor screeds must also be removed in their entirety.
Any gaps between the boards, screw holes and cracks in the board surfaces must be filled / levelled with a wall level suitable for chipboard- / OSB surfaces. A wall level suitable for chipboard surfaces should also be used for possible over-levelling. When using screeds, also check with the floor screed manufacturer for a suitable primer.
Primer
Prior to coating, cleaned and repaired chipboard- / OSB substrates are primed with ELAPROOF PRIMER without the addition of water. Allow the primer to dry completely before applying ELAPROOF + SAND. The purpose of the primer is to seal the surface of the chipboard from the moisture released by the incoming coating.
Chipboard walls painted with a good quality primer do not need to be primed separately. Old primer or topcoat coats can be sanded mechanically or treated with suitable washing liquid to ensure adhesion of ELAPROOF + SAND Wall covering. In these cases, it is also recommended to carry out a separate adhesion test before treating larger areas, to ensure that the adhesion between ELAPROOF + SAND Wall covering and the paint and at the same time sufficient adhesion of the original paint to the substrate after the coating is applied.
Coating
Before starting the coating, the ELAPROOF + SAND Wall covering must be mixed. Use a mixing paddle in the mixer that does not take air into the sealant when mixing, eg COLLOMIX KR series mixing paddle.
The primed substrate is coated with ELAPROOF + SAND (M1 / EC 1) wall coating. The coating is applied to the substrate with a steel spatula.
ELAPROOF + SAND Wall covering is applied to the substrate in two separate applications. The consumption of each application must be at least approx. 1.0 kg / m2, in which case the total consumption is at least 2.0 kg / m2. The actual dry film thickness must be min. 1.0 mm.
The drying time between coats of ELAPROOF + SAND depends largely on the conditions at the installation site. At conditions of approx. + 20 °C, 50% RH can be applied a second time approx. 5 h after the first application. Lower temperatures and higher humidity significantly extend the drying time.
The ELAPROOF + SAND Wall covering applied twice can be applied after approx. 12 hours in conditions + 20 °C, 50 % RH.
Topcoat
The dried ELAPROOF coating is treated with clear ELACOAT TOPCOAT or tinted ELACOAT TOPCOAT RAL topcoats to facilitate cleaning and maintenance. For monochromatic floors, we recommend top coating with tinted ELACOAT TOPCOAT RAL topcoat to even out any colour differences in the ELAPROOF + SAND coating. On flaked floors, we recommend flaking with ELAPROOF PVA paint flakes on wet ELACOAT TOPCOAT RAL topcoat and, after drying, finishing with clear ELACOAT TOPCOAT topcoat.
In the topcoat, the topcoat component A is first mixed for 1 to 2 minutes, then the hardener component B is added to the mixed A component and mixed again for 2-3 minutes. Use, for example, the COLLOMIX KR series mixing paddle for mixing.
The mixture is applied on top of the dried ELAPROOF coating with a short-pile roller (6 – 7 mm) by cross-rolling. The consumption of the topcoat is approx. 110 – 200 g / m2 / application, depending on the degree of roughness of the selected ELAPROOF + SAND coating. The topcoat is dry to dry after approx. 16 h at + 20 °C, 50% RH. The full duration of mechanical stress is achieved under the above conditions in about 4 days and the full chemical duration in about 7 days.
NOTE! Some shades of ELACOAT TOPCOAT RAL topcoats may require 2 to 3 coats to achieve sufficient coverage! See a separate table for the coverage of ELACOAT TOPCOAT RAL topcoats.
Build Care Oy owns all rights to this coating work method. Designers are free to use this coating work method when creating repair and coating plans!
ALWAYS READ THE PRODUCT DESCRIPTIONS FOR THE PRODUCTS PRESENTED IN THE COATING WORK METHOD BEFORE STARTING THE INSTALLATION!
Structural drawings
All structural drawings related to ElaProof products in DWG and PDF format from the ProdLib-service.
Updated: 01/2022 | JKo
1.3 Mineral-based plate roof (Minerite roof) repair proposal
Coating of a mineral-based plate roof (Minerite roof)
General
This repair method proposal is indicative and deals with the coating of a mineral-based sheet roof with ElaProof H, S and ElaProof Cool Roof coatings. There must be no previous coatings on the mineral-based tile roof. If previous coatings are found, it is necessary to make sure of the adhesion of the ElaProof coating to the previous coating by performing a separate adhesion test.
The repair proposal is not a repair plan. The overall design of coating/sealing is always the responsibility of the site-specific designer.
Inspection of the platform
Before coating with ElaProof products, it is necessary to check the condition of the original mineral-based tile roof. As a general rule, the ceiling boards must be intact and the surface of the boards must not be weak so that good adhesion of the ElaProof coating is not possible. If the roof boards are fixed with nails, the fixing method should be changed to screws before coating. Note! Check with the occupational health and safety authorities whether this possible work phase requires an Asbestos demolition permit!
During the inspection, also mark any cracks in the boards for further processing.
Platform preparations
All branches, leaves and other loose debris and impurities accumulated on the roof are removed.
The roof to be coated is washed with a suitable high-pressure washer and detergent, e.g. Biocomb Puhdas Katto Extra Strong or SikaGard-715W.
Washing removes all organic material and other impurities from the roof. Washing also removes all the original factory coating from the surface of the boards, so that the ElaProof coating achieves the best possible adhesion.
Note! In Finland, washing with a pressure of more than 50 bar requires Asbestos demolition permits from the person performing the work. In this case, the washing water must also be collected. If necessary, contact the occupational health and safety authorities!
Priming
After proper cleaning, the surface of a mineral-based tile roof is often very porous, so proper priming is very important to prevent the actual coating from rotting.
Priming is carried out with a primer with the following mixture ratio:
10 liters of ElaProof S spray coating + 2 liters of ElaProof Primer primer + 2 liters of water.
Mix the mixture mechanically with a drill whisk into a liquid, uniform solution and spread it in an even layer on the surface of the ceiling boards, e.g. by brushing. Further treatments can be started when the primer is no longer damaged when walking on the roof, but no later than 24 hours after priming.
Sealing of penetrations and possible cracks
ElaProof H coating and ElaProof Roof reinforcement fabric can be used to seal the penetrations in the roof when their adhesion surfaces are metal or PVC plastic. If necessary, ElaProof H coating can be thinned 1-2% with water to make working easier.
The ElaProof ROOF reinforcement fabric is raised as a collar against the penetration to a height of at least 20 mm. If the grommets to be sealed allow a preformed grommet to be threaded over the grommet as a collar, the grommets can be shaped from ElaProof Roof reinforcement fabric if necessary.
If the grip surfaces of the grommets are EPDM rubber, PP plastic or PE plastic, it is recommended to use cloth-coated Butyl tape or a cloth-coated Butyl rubber grommet on which the ElaProof coating is applied as a grip bridge in the area to be raised as a collar.
Any cracks in the roof boards are also sealed with a combination of ElaProof H coating and ElaProof Roof reinforcement fabric before the actual coating.
Coating with ElaProof coating
ElaProof H coating is used, if necessary, for coating the entire roof, but most commonly for patching, sealing penetrations and treating the edge areas of the sprayed roof before spraying to avoid splashes (reduces the need for protection). If necessary, ElaProof H coating can be thinned 1-2 % with water to make working easier.
ElaProof H coating is applied with a spatula, brush or short-pile roller. ElaProof H coating is recommended to be applied to the area to be coated in 2 separate application times. Total material flow for primed according to the instructions for a mineral-based plate roof is 1.4-1.6 l/m2, in which case the dry film thickness is min. 1.0 mm.
ElaProof S and ElaProof Cool Roof spray coating is applied with an airless high-pressure sprayer suitable for the purpose. The injection pressure must be 170-300 bar and the yield min. 6 l/min, The recommended nozzle sizes are 527-529 and 627-629. It is recommended to apply the ElaProof S and ElaProof Cool Roof coatings to the area to be coated in 2 separate application times.
The total material consumption for mineral-based plate roof is 1.4-1.6 l/m2, depending on the coarseness and porosity of the platform, in which case the dry film thickness is min. 1.0 mm.
ElaProof H, S and Cool Roof are rainproof for 3-7 hours after coating, depending on the prevailing temperature and relative air humidity during the work. Build Care Oy recommends that the average daily temperature during ElaProof coating is at least + 10 °C.
The coating reaches its full mechanical properties after approx. 3 weeks. After that, the surface can be painted over if necessary, for example.
Overpainting
If, for example, the desired color shade cannot be found in the ElaProof coating, it is possible to paint the ElaProof coating. The painting should be done with the tested water-thinned tin roof paints recommended by Build Care Oy, which are e.g.
- Teknos Kirjo Aqua
- Tikkurila Panssari Akva
- Fintex Tin ceiling paint
Note! Repainting is not a necessary measure but is only carried out if necessary.
Build Care Oy owns all rights to this repair proposal. Designers can freely use this repair method suggestion when preparing repair plans!
ALWAYS READ THE PRODUCT DATA SHEETS FOR THE PRODUCTS PRESENTED IN THE REPAIR PROPOSAL BEFORE STARTING THE INSTALLATION!
Structural drawings
All structural drawings related to ElaProof products in DWG and PDF format from the ProdLib-Service.
Updated: 08/2023 | JKo
1.2 Stone-faced scattered felt roof repair proposal
Coating of a stone-faced scattered felt roof
General
This repair method proposal is indicative and deals with the coating of stone-surfaced roof felt with ElaProof H, S and ElaProof Cool Roof coatings. There must be no previous coatings on top of the stone-surfaced roofing felt. If previous coatings are found, it is necessary to make sure of the adhesion of the ElaProof coating to the previous coating by performing a separate adhesion test.
The repair proposal is not a repair plan. The overall design of coating/sealing is always the responsibility of the site-specific designer.
Platform inspection
Before coating with ElaProof products, it is necessary to check the condition of the original felt roof with a stone surface. Especially on roofs with several felt layers on top of each other, the roof felt bulges. Usually, this is due to the intense heat stress that occurs during the summer, when the different felt layers may separate from each other. If these bumps occur, it is appropriate to repair them before coating. The repair is done by cutting off the detached area from the roofing felt and patching it with a corresponding type of roofing felt, following the roofing felt manufacturer’s instructions for attaching the roofing felt.
Also check the seams of the roofing felt to make sure they are not coming apart. If there is separation in the seams, fix the detached seams with bituminous glue intended for gluing roof felt.
It is typical for some aggregate-surfaced roof blankets that the aggregate is weakly attached to the surface of the blanket. Since ElaProof coatings form their adhesion primarily to this aggregate, it is possible that when the aggregate loses its adhesion to the felt, the coating also remains a floating film in this respect. For this reason, it is recommended to carry out a trial coating of approximately 1 m2 on the roof in a place that is exposed to the heat of the sun before coating the entire roof. Let the test area dry for at least 7 days and try to remove the coating film from its edge. If the aggregate comes off easily with the coating from the surface of the felt, it is possible that bubbles will appear in the coating later on. In this case, contact Build Care Oy’s technical service to resolve the matter.
Note! It is possible to influence this matter mentioned above by choosing the lightest possible e.g. white ElaProof coating for use, in which case the color of the coating lowers the surface temperature of the roof.
Platform preparations
All branches, leaves and other loose debris and impurities accumulated on the roof are removed.
The roof to be coated is washed with a suitable high-pressure washer and detergent, e.g. Biocomb Puhdas Katto Extra Strong or SikaGard-715W.
After a longer dry period, larger roof surfaces can also be cleaned with so-called as dry brushing using a combustion engine powered brushing machine. Even after this cleaning method, the roof must be treated with a detergent and water that destroys moss and algae growth.
Sealing of penetrations
ElaProof H coating and ElaProof Roof reinforcement fabric can be used to seal the penetrations in the roof when their adhesion surfaces are metal or PVC plastic.
If necessary, ElaProof H coating can be thinned 1-2% with water to make working easier. The ElaProof ROOF reinforcement fabric is raised as a collar against the penetration to a height of at least 20 mm. If the grommets to be sealed allow a preformed grommet to be threaded over the grommet as a collar, the grommets can be shaped from ElaProof Roof reinforcement fabric if necessary.
If the grip surfaces of the grommets are EPDM rubber, PP plastic or PE plastic, it is recommended to use cloth-coated Butyl tape or a cloth-coated Butyl rubber grommet on which the ElaProof coating is applied as a grip bridge in the area to be raised as a collar.
Coating with ElaProof coating
ElaProof H coating is used, if necessary, for coating the entire roof, but most commonly for patching, sealing penetrations and treating the edge areas of the sprayed roof before spraying to avoid splashes (reduces the need for protection). If necessary, ElaProof H coating can be thinned 1-2% with water to make working easier.
ElaProof H coating is applied with a spatula, brush or short-pile roller. ElaProof H coating is recommended to be applied to the area to be coated in 2 separate application times. The total material consumption for loose felt roofs is 1.6-1.8 l/m2, in which case the dry film thickness is min. 1.0 mm.
ElaProof S and ElaProof Cool Roof spray coating is applied with an airless high-pressure sprayer suitable for the purpose. The injection pressure must be 170-300 bar and the yield min. 6 l/min, The recommended nozzle sizes are 527-529 and 627-629. It is recommended to apply the ElaProof S and ElaProof Cool Roof spray coatings to the area to be coated in 2 separate application times.
The total material consumption for loose felt roofs is 1.6-1.8 l/m2, depending on the coarseness of the felt aggregate, in which case the dry film thickness is min. 1.0 mm.
ElaProof H, S and Cool Roof are rainproof for 3-7 hours after coating, depending on the prevailing temperature and relative air humidity during the work. Build Care Oy recommends that the average daily temperature during ElaProof coating is at least + 10 °C.
The coating reaches its full mechanical properties after approx. 3 weeks. After that, the surface can be painted over if necessary, for example.
Overpainting
If, for example, the desired color shade cannot be found in the ElaProof coating, it is possible to paint the ElaProof coating. The painting should be done with the tested water-thinned tin roof paints recommended by Build Care Oy, which are e.g.
- Teknos Kirjo Aqua
- Tikkurila Panssari Akva
- Fintex Tin ceiling paint
Note! Repainting is not a necessary measure, but is only carried out if necessary.
Build Care Oy owns all rights to this repair proposal. Designers can freely use this repair method suggestion when preparing repair plans!
ALWAYS READ THE PRODUCT DATA SHEETS FOR THE PRODUCTS PRESENTED IN THE REPAIR PROPOSAL BEFORE STARTING THE INSTALLATION!
Structural drawings
All structural drawings related to ElaProof products in DWG and PDF format from the ProdLib-Service.
Updated: 08/2023 | JKo
1.1 Factory-coated tin roof repair proposal
Coating of a factory-coated tin roof
General
This repair method proposal is indicative and deals with the coating/sealing of a PVC, Plastisol (PVC), Pural, Acrylic (AK) and Polyester (PE) paint-coated tin roof with ElaProof H, S and ElaProof Cool Roof coatings.
The repair proposal is not a repair plan. The overall design of coating/sealing is always the responsibility of the site-specific designer.
Inspection of the platform
Before coating with ElaProof products, it is necessary to check the type, condition, surface cracking and especially adhesion to the substrate of the original tin roof coating. The type of coating can usually be found out most easily on the back of the plate. Adhesion of the original coating can be evaluated with a cut test (so-called X-cut test) or a grid test according to the EN ISO 2409 standard, if the thickness of the paint film is less than 250 µm. In the X-cut test, cross cuts are made on the surface with a sharp knife through the coating. If the original coating comes off with a knife blade at the intersection of the cuts, the adhesion to the substrate is weak and may cause the original coating to come off again after recoating. If the adhesion is weak and/or the original coating is detached from its substrate in large areas, it is recommended to remove all the original coating. The surface cracking of the original coating should also be checked, e.g. with a 50 x magnifying optical device. Abundant surface cracking also causes the need to completely remove the original coating.
Platform preparations
All branches, leaves and other loose debris and impurities accumulated on the roof are removed. Smaller areas with peeling or flaking of the original coating are delineated by removing the loose areas down to a solid coating.
Any rust is removed with a wire brush or sanding in such a way that all loose rust material can be removed.
The roof to be coated is washed with a suitable high-pressure washer and detergent, e.g. Tikkurila Panssaripesu, Teknos Rensa Steel Peltipesu, Biocomb Pure Roof Extra Strong or SikaGard-715W.
Anti-rust
Rusty areas and metal-clean surfaces can be primed with water-based paint suitable for rust prevention, e.g. Tikkurila Rostex Super Akva or Teknos Ferrex Aqua. In rusty areas, it is also possible to use rust converters, e.g. Tikkurila Rust Converter. Always follow the instructions of the manufacturer of the product intended for rust treatment regarding the time window for further treatment.
Patching of holes, cracks and seams
Small holes and seams do not require special measures but can be bridged with ElaProof H coating. Larger holes and seams (width over 2 mm and depth over 5 mm) are recommended to be patched reinforced with ElaProof Roof reinforcement fabric.
When patching larger holes, you should also check the underside of the sheet metal cover. If there is a significant amount of rust, the underside of the cover should also be treated with ElaProof H coating when patching, in order to make the rusted area oxygen- free.
Possible overlapped joints of sheets in the sheet metal roof, where there is no separate sealing, should be treated with a combination of ElaProof H coating and ElaProof Roof reinforcement fabric before the actual coating.
Sealing of penetrations
ElaProof H coating and Elaproof Roof reinforcement fabric can be used to seal the penetrations in the roof when their adhesion surfaces are metal or PVC plastic.
If necessary, ElaProof H coating can be thinned by 1-2 % with water to make working easier. The ElaProof Roof reinforcement fabric is raised as a collar against the penetration to a height of at least 20 mm. If the grommets to be sealed allow a preformed grommet to be threaded over the grommet as a collar, the grommets can be shaped from ElaProof Roof reinforcement fabric if necessary.
If the grip surfaces of the grommets are EPDM rubber, PP plastic or PE plastic, it is recommended to use cloth-coated Butyl tape or a cloth-coated Butyl rubber grommet on which the ElaProof coating is applied as a grip bridge in the area to be raised as a collar.
Coating with ElaProof coating
ElaProof H coating is used, if necessary, for coating the entire roof, but most commonly for patching, sealing penetrations and treating the edge areas of the roof to be sprayed before spraying to avoid splashes (reduces the need for protection).
If necessary, ElaProof H coating can be thinned by 1-2 % with water to make working easier.
The ElaProof H coating is applied with a spatula, brush or short-pile roller. It is recommended to apply the ElaProof H coating to the area to be coated in 2 separate application times.
The total material consumption for tin roofs is min. 1.0 l/m2, in which case the dry film thickness is min. 0.6 mm.
ElaProof S and ElaProof Cool Roof coatings are applied with an airless high-pressure sprayer suitable for the purpose. The injection pressure must be 170-300 bar and the yield min. 6 l/min, The recommended nozzle sizes are 527-529 and 627-629. It is recommended to apply ElaProof S and ElaProof Cool Roof coatings to the area to be coated in 2 separate application times. The total material consumption for tin roofs is min. 1.0 l/m2, in which case the dry film thickness is min. 0.6 mm.
ElaProof H, S and ElaProof Cool Roof are rainproof for 3-7 hours after coating, depending on the prevailing temperature and relative air humidity during the work. Build Care Oy recommends that the average daily temperature during ElaProof coating is at least 10 °C.
The coating reaches its full mechanical properties after approx. 3 weeks. After that, the surface can be painted over if necessary, for example.
Overpainting
If, for example, the desired color shade cannot be found in the ElaProof coating, it is possible to paint the ElaProof coating. The painting should be done with the tested water-thinned tin roof paints recommended by Build Care Oy, which are e.g.
- Teknos Kirjo Aqua
- Tikkurila Panssari Akva
- Fintex Tin ceiling paint
Note! Repainting is not a necessary measure but is only carried out if necessary.
Build Care Oy owns all rights to this repair proposal. Designers can freely use this repair method suggestion when preparing repair plans!
ALWAYS READ THE PRODUCT DATA SHEETS FOR THE PRODUCTS PRESENTED IN THE REPAIR PROPOSAL BEFORE STARTING THE INSTALLATION!
Structural drawings
All structural drawings related to ElaProof products in DWG and PDF format from the ProdLib-Service.
Updated: 08/2023 | JKo
ELACOAT TopCoatRAL instructions for use
Preparations
The substrate must be structurally sound, clean, dry and free from substances that weaken adhesion such as dust, dirt, grease, oil or loose material layers. ELACOAT TOPCOAT RAL must be applied within 48 hours of installing the ElaProof coating.
Application
The product is delivered in a 2-component package, where the components are in the correct mixing ratio. Mix component A for at least 1-2 minutes. Then pour the entire B component into the A component and mix the mass carefully with a suitable mixer for at least 2–3 minutes until the varnish is of uniform quality. After that, pour the mixture into a clean container and mix for a while. Avoid creating air bubbles in the mixture during mixing.
On dense and non-absorbent substrates such as ElaProof coating, pour ELACOAT TOPCOAT RAL onto the substrate and spread parallel with a roller (pile 7-11 mm) or rubber trowel. On smooth surfaces, roll with a short-pile microfiber roller. Finish with a new microfiber roller in parallel. Avoid air bubbles during installation.
On absorbent and porous substrates, use a trough intended for a roller or a similar container to help with application. Dip the roller in the trough and roll the excess surface varnish on the collection edge of the trough. After that, apply the topcoat by rolling it parallel to the base.
Clean used tools with water before they dry.
Varnishing again
Varnishing must be done again within 1-2 days of the previous one.
Cleaning and maintenance
Separate maintenance and cleaning instructions available. We recommend regular cleaning and a maintenance program. Before using the varnished surface, we recommend basic cleaning and maintenance.
Technical support
You can get information on the possibilities of using the systems and detailed advice on the use of ELACOAT and ElaProof products from Build Care Oy’s technical advice, tel. +358 20 790 2710 or info@buildcare.fi
Structural drawings
You can find all structural drawings related to ElaProof products in DWG and PDF format in the ProdLib-service.
01/2023 | MA
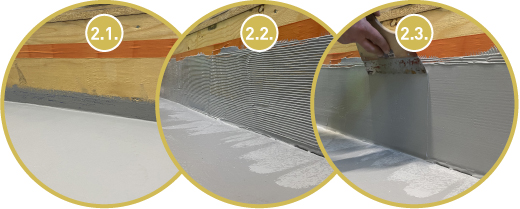
ElaProof Art&Deco Colour SAND Installation instructions
1. Groundwork is the most important stage
1.1. Thoroughly clean the surfaces to be treated of dirt, sand, and dust.
1.2. Remove any old paint, coating, and rust.
1.3. You can use a pressure washer, brush, or other mechanical cleaning to clean the surfaces, depending on the surface material being treated.
1.4. Prime porous new or old surfaces (e.g., concrete, plastered surfaces, gypsum, and wood) with ElaProof Primer if necessary. The treatment improves the adhesion of ElaProof to the substrate by clogging the pores of the substrate.
2. Treat the surfaces first with ElaProof
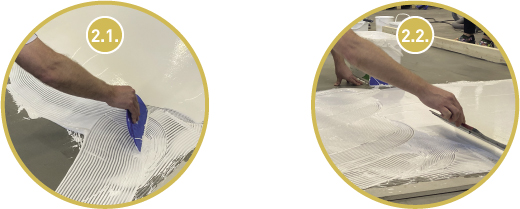
2.1. Start by treating all horizontal and vertical surfaces with ElaProof. This ensures the waterproofing capacity of the site. Pour ElaProof directly from the jar evenly over an area of approx. 2 m2. When applying the first coat of ElaProof, use a coarse spatula, e.g., TKB B2 or B3.
2.2. Smooth the surface of the ElaProof with a metal spatula as smooth as possible, using wide movements.
Allow the ElaProof dry in peace!
Remember that drying out ElaProof is the evaporation of water. The drying time depends on the layer thickness, the absorbency of the substrate and the ambient temperature, dew point and relative humidity.
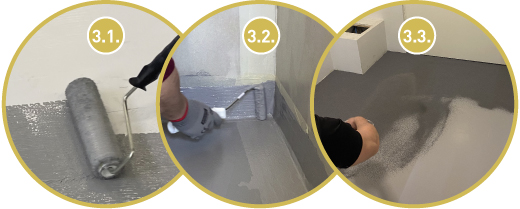
3. Treat the surfaces first with ElaProof
3.1. Start the work by rolling a new layer of ElaProof coating on the surface to be treated with a short-haired roller (approx. 5-7 mm pile). If necessary, you can thin the ElaProof mass (max. 1% by volume).
3.2. It is easiest to handle the vertical surfaces of the stairs and the risers with a brush or a small roller. If it is a large surface, start with max. 4-5 m² in the area.
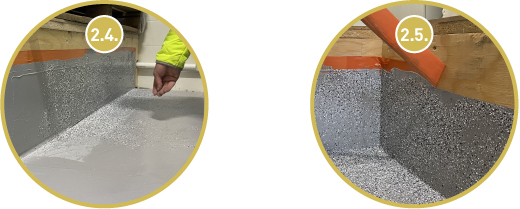
3.3. We recommend working in pairs – a small area at a time, with one person applying ElaProof and the other throwing sand evenly over the ElaProof coating. The easiest way to spread colored sand is by hand throwing or “sowing” sand from e.g., a small plastic bucket.
3.4. In the case of stairs and lifts, it is recommended to spread the sand from the pile with a brush, in which case the sand is spread carefully without touching the ElaProof surface.
Allow the ElaProof coating and colored sand to dry overnight. Collect the excess color sand and treat the surfaces with ELACOAT TOPCOAT according to point 4.
4. ELACOAT TOPCOAT treatment increases durability and makes cleaning easy!
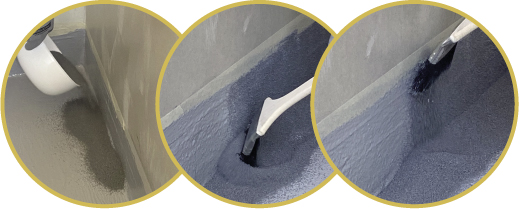
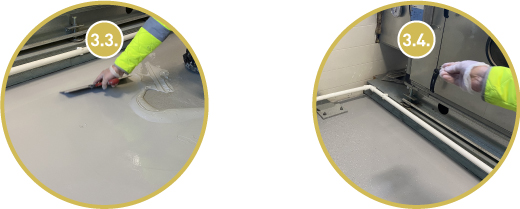
4.1. We recommend the use of ELACOAT TopCoat on horizontal surfaces that are exposed to wear, such as stairs and floors. The products increase the durability of wear and make it much easier to keep the item clean.
4.2. Apply after the last ElaProof surface has dried for at least one day. Remember to remove the excess colored sand before processing!
4.3. The product is spread over the colored sand by rolling with a short-haired lint-free roller.
4.4. In stair steps, it is also worth treating the vertical surfaces, which makes cleaning the object easy.
Mixing instructions for ELACOAT TOPCOAT:
The product is delivered in 2-component packages, where the components are in the correct mixing ratio. Mix component A for at least 1-2 minutes. Then pour the entire contents of the B component into the A component and mix the mass carefully with a suitable mixer for at least 2-3 minutes until the mass is of uniform quality. After that, pour the mixture into a clean container and mix briefly. Avoid mixing air bubbles into the mixture during mixing.
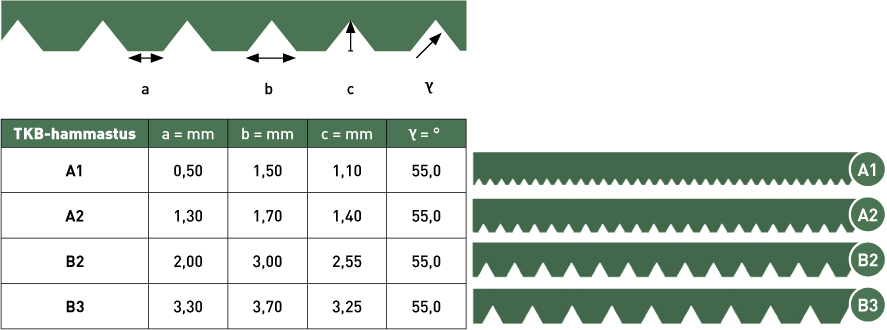
This is how you choose the right spatula!
Various spatulas are used to apply the ElaProof Art & Deco products. See the table for instructions on choosing the right spatula.
TKB spatula instructions and TKB-indentation
Structural drawings
All structural drawings related to ElaProof products in DWG and PDF format from the ProdLib-service.
Updated: 01/2023 | MA
ElaProof Art&Deco Colour Chips Installation instructions
1. Groundwork is the most important stage
1.1. Thoroughly clean the surfaces to be treated of dirt, sand, and dust.
1.2. Remove any old paint, coating, and rust.
1.3. You can use a pressure washer, brush, or other mechanical cleaning to clean the surfaces, depending on the surface material being treated.
1.4. Prime porous new or old surfaces (e.g., concrete, plastered surfaces, gypsum, and wood) with ElaProof Primer if necessary. The treatment improves the adhesion of ElaProof to the substrate by clogging the pores of the substrate.
2.1. Start by trimming any lifts with protective tape.
2.2. ElaProof treatment of vertical surfaces: Treat all the vertical surfaces you have delimited with ElaProof. First use a coarse spatula, e.g., TKB B2 or B3. See the next page for instructions on selecting a spatula. Instructions for applying ElaProof can be found at elaproof.com
2.3. Then smooth the surface left by the coarse spatula as smooth as possible using a metal spatula.
NOTE! If there are plenty of vertical surfaces, then proceed by approx. 1-2 meters at a time. Please follow the instructions in section 2.4.
2.4. Flaking the vertical surfaces: Throw the flakes of ElaProof Art & Deco Color Chips onto the ElaProof leveled with a metal trowel by hand. At this point, you can adjust the number of flakes on the final surface.
2.5. When you have finished flaking, be sure to remove the protective tape!
Let the ElaProof coating and flakes dry in peace!
Remember that drying out ElaProof is the evaporation of water. The drying time depends on the layer thickness, the absorbency of the substrate and the ambient temperature, dew point and relative humidity.
3. Treatment of horizontal surfaces
3.1. Start by treating all horizontal surfaces with ElaProof. This ensures the waterproofing capacity of the site. Pour ElaProof directly from the jar evenly over an area of approx. 2 m2. When applying the first coat of ElaProof, use a coarse spatula, e.g., TKB B2 or B3.
3.2. Smooth the surface of the ElaProof with a metal spatula as smooth as possible, using wide movements.
Allow the first layer of ElaProof to dry in peace overnight.
3.3. Continue by treating the horizontal surfaces with ElaProof slightly diluted with water (max. 1% by volume). Pour ElaProof evenly from the jar evenly over an area of approx. 2 m2 for easy flaking. Use a fine spatula, e.g., TKB A1 or A2. Smooth the surface as smoothly as possible with a metal spatula, using wide movements.
3.4. The easiest way to spread the flakes is to throw them by hand. At this point, you can adjust the number of flakes on the final surface.
Allow another layer of ElaProof and flake to dry in peace overnight. Collect the excess flake and treat the surfaces with ELACOAT TopCoat according to step 4.
4. ELACOAT TopCoat treatment
4.1. We recommend the use of ELACOAT TopCoat on horizontal surfaces that are exposed to wear, such as stairs and floors.
The products increase the durability of wear and make it much easier to keep the item clean.
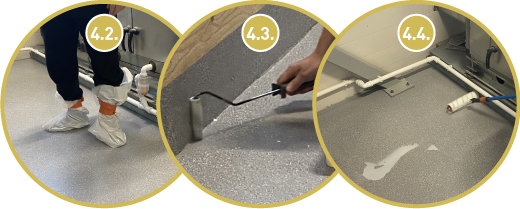
4.2. Protect the footwear with plastic bags, for example, to prevent dirt from sticking to the base.
4.3. Start treatment on vertical surfaces with a short-haired lint-free roller after the last ElaProof has dried for at least one day. Be sure to remove any excess flake before processing!
4.4. On horizontal surfaces, the product is applied on top of colored flakes by rolling with a short-haired lint-free roller. Pour the product directly on the floor and roll in parallel movements.
Mixing instructions for ELACOAT TOPCOAT
The product is delivered in 2-component packages, where the components are in the correct mixing ratio. Mix component A for at least 1-2 minutes. Then pour the entire contents of the B component into the A component and mix the mass carefully with a suitable mixer for at least 2-3 minutes until the mass is of uniform quality. After that, pour the mixture into a clean container and mix briefly. Avoid mixing air bubbles into the mixture during mixing.
This is how you choose the right spatula!
Various spatulas are used to apply the ElaProof Art & Deco products. See the table for instructions on choosing the right spatula.
TKB spatula instructions and TKB-indentation
Structural drawings
All structural drawings related to ElaProof products in DWG and PDF format from the ProdLib-service.
Updated: 01/2023 | MA
ElaProof +SAND Wall covering instructions for use
ElaProof + SAND Floor Covering is M1 approved. It is suitable for indoor and outdoor use e.g. terraces, stairs, balconies and bathrooms.
In the product, the ElaProof coating and the sand are in a ready-to-use mixture. There are three sand sizes to choose from: fine, medium rough and rough.
Prelimenary work before coating
The product is suitable for indoor and outdoor use on most floor surfaces. The floor surface can be e.g. chipboard, gypsum board, concrete, ceramic tile, plastic carpet, epoxy, acrylic and polyurethane. Before starting the coating work, familiarize yourself with the preliminary work required for the surface material of your site. Please, download the ElaProof Coating Method for Flooring at:
www.elaproof.com
Coating:
Mix ElaProof+SAND Floor Coating before use. Use a whisk in the mixer that does not take air into the sealant when mixing. ElaProof+SAND Floor covering is applied to the substrate with a steel trowel in two separate applications. The consumption of each application must be at least approx. 1.0 kg/m2, in which case the total consumption is at least 2.0 kg/m2. The final dry film thickness must be min. 1.0 mm. The drying time between layers is highly dependent on the conditions at the installation site. Under conditions of about +20°C, 50% RH, application can be performed about 5 hours after the first application. Lower temperatures and higher humidity significantly extend the drying time. The ElaProof + SAND floor covering, applied twice, can be applied after approx. 12 h at + 20°C, 50% RH.
NOTE! If necessary, the product can be diluted 1 to 2 percent by weight (2 to 4 dl for a 20 kg container). If you dilute the product, start with a small amount of water and add more if necessary.
Varnishing:
If necessary, the dried ElaProof + SAND coating can be treated with clear ElaProof TopCoat or coloured ElaProof TopCoat RAL topcoats to facilitate cleaning and maintenance. For monochrome applications, we recommend topcoating with ElaProof TopCoat RAL topcoat to compensate for any color differences in the ElaProof + SAND coating. Mix the topcoat according to the instructions on the package.
Apply the top coat to the dried ElaProof+SAND coating with a short-pile roller (6-7 mm) by cross-rolling. The consumption of the topcoat is approx. 110-200 g /m2/ application, depending on the degree of roughness of the selected ElaProof+SAND coating. The topcoat is walking dry after approx. 16 h at +20°C, 50% RH. The full duration of mechanical stress is achieved under the above conditions in about 4 days and the full chemical duration in about 7 days.
Note:
Some shades of ElaProof TopCoat RAL topcoats may require 2-3 coats to achieve sufficient coverage! See a separate table for the opacity of ElaProof TopCoat RAL topcoats.
Storage:
MUST NOT FREEZE BEFORE USE. The substance will keep unopened in a cool place away from sunlight for at least 12 months.
Before use:
Please, check out ElaProof Coating work methods at: www.elaproof.com
Structural drawings
All structural drawings related to ElaProof products in DWG and PDF format from the ProdLib-service.
Updated: 06/2023 | MA
ElaProof+SAND Floor covering instructions for use
ElaProof + SAND Floor Covering is M1 approved. It is suitable for indoor and outdoor use e.g. terraces, stairs, balconies and bathrooms.
In the product, the ElaProof coating and the sand are in a ready-to-use mixture. There are three sand sizes to choose from: fine, medium rough and rough.
Preliminary work before coating
The product is suitable for indoor and outdoor use on most floor surfaces. The floor surface can be e.g. chipboard, gypsum board, concrete, ceramic tile, plastic carpet, epoxy, acrylic and polyurethane. Before starting the coating work, familiarize yourself with the preliminary work required for the surface material of your site. Please, download the ElaProof Coating Method for Flooring at:
www.elaproof.com
Coating:
Mix ElaProof+SAND Floor Coating before use. Use a whisk in the mixer that does not take air into the sealant when mixing. ElaProof+SAND Floor covering is applied to the substrate with a steel trowel in two separate applications. The consumption of each application must be at least approx. 2.0 kg/m2, in which case the total consumption is at least 4.0 kg/m2. The final dry film thickness must be min. 2.0 mm. The drying time between layers is highly dependent on the conditions at the installation site. Under conditions of about +20°C, 50% RH, application can be performed about 5 hours after the first application. Lower temperatures and higher humidity significantly extend the drying time. The ElaProof + SAND floor covering, applied twice, can be applied after approx. 12 h at + 20°C, 50% RH.
NOTE! If necessary, the product can be diluted 1 to 2 percent by weight (2 to 4 dl for a 20 kg container). If you dilute the product, start with a small amount of water and add more if necessary.
Varnishing:
The dried ElaProof+SAND coating is treated with clear ElaProof TopCoat or coloured ElaProof TopCoat RAL topcoats to facilitate cleaning and maintenance. For monochromatic floors, we recommend topcoating with ElaProof TopCoat RAL topcoat to compensate for any color differences in the ElaProof+SAND coating. Mix the topcoat according to the instructions on the package.
Apply the top coat to the dried ElaProof+SAND coating with a short-pile roller (6-7 mm) by cross-rolling. The consumption of the topcoat is approx. 110-200 g /m2/ application, depending on the degree of roughness of the selected ElaProof+SAND coating. The topcoat is walking dry after approx. 16 h at +20°C, 50% RH. The full duration of mechanical stress is achieved under the above conditions in about 4 days and the full chemical duration in about 7 days.
Note:
Some shades of ElaProof TopCoat RAL topcoats may require 2-3 coats to achieve sufficient coverage! See a separate table for the opacity of ElaProof TopCoat RAL topcoats.
Storage:
MUST NOT FREEZE BEFORE USE. The substance will keep unopened in a cool place away from sunlight for at least 12 months.
Structural drawings
All structural drawings related to ElaProof products in DWG and PDF format from the ProdLib-service.
Updated: 06/2023 | MA
ElaProof Base Fabric Installation instructions
Using a base fabric for sealing
Apply a large amount of ElaProof sealing compound to the cleaned, flat surface with a spatula or brush so that the compound adheres to the substrate throughout. In structures where movements are possible, the ElaProof Base Fabric is pressed into the wet mass, for example with a spatula, so that no air is left between the base fabric and the base. Apply a 2nd coat of ElaProof on top of the base fabric so that the base fabric stays in place and is covered throughout. Second coat ElaProof is easiest to apply after the first coat has dried. The joints of the base fabric are overlapped by at least 30 mm and the base fabric is glued with ElaProof to the underlying support fabric. Particular attention must be paid to the tightness of corners and bushings.
Joints
The sealing principles of the connections are shown in the drawing ElaProof Indoor air sealing details that can be found on ProdLib library.
For joints with possible movements, ElaProof Base Fabric is used. In structures where there is no movement, such as in old structures where drying shrinkages and depressions have already occurred, the installation can be done without a base fabric. However, we still recommend the use of a base fabric.
The seal is overlapped on the surfaces to be sealed
– on concrete surfaces at least 30 mm
– on wooden surfaces at least 15 mm
Sealing of planar surfaces
ElaProof is applied to the flat surfaces with a trowel, roller, brush, or spray. More layers may be required to provide sufficient film thickness on the wall, ceiling, or other floating surfaces. It is recommended to apply the next coat after at least 3 hours.
The recommended material consumption is a total of 1.0 – 1.4 l / m2. The surface is touch dry after 3-4 h and walk-resistant after 15 h after installation (20 °C, RH 45%, 1 l / m2).
Post-processing
When the sealing has dried and its success has been verified, the sealing is protected as necessary with a wear-resistant surface. The dried ElaProof surface can, e.g., be painted, tiled, or plastered.
Requirement
Successful airtightness requires a dry film thickness of at least 0.5 mm, which on a flat surface corresponds to a material consumption of 0.8 l / m2. The finished coating must be well adhered to the substrate throughout. The material should be well bonded and there should be no holes in the coating.
Verification of success for airtightness usually requires quality assurance, which can be carried out, for example with marker tests in accordance with Finnish RT Card – RT 14-11197.
Cleaning of tools
Clean tools with water.
Structural drawings
All structural drawings related to ElaProof products in DWG and PDF format from the ProdLib service.
Updated: 01/2023 | MA